
Connect Claude Desktop to CVizza
Add CVizza to Claude Desktop as a custom connector, sign in, choose what Claude can access, and work with your CVs, profile and applications.
You can add CVizza to the Claude Desktop app as a custom connector. You sign in to CVizza in your browser, choose what Claude may access, and then ask Claude in plain language to review your CV drafts, candidate profile and applications. You do not create or copy a token. This guide shows how to set up the connector, what to try first, and how to disconnect.
What Claude can do with CVizza
Claude works only with your own CVizza data and only within the permissions you approve:
- CV drafts: list and read your CVs, create a CV from your candidate profile, edit or copy a draft, choose a template, and export a draft as PDF or DOCX.
- Candidate profile: read your profile, update it, and add or change experience, education, skills, languages, certifications and projects.
- Applications: list your applications and their activity, change a status, add a note, and archive or restore an application.
CVizza does not run an AI model for this. Claude does the reasoning, and CVizza checks every request against the permissions you approved.
Some steps stay in the CVizza web app: Claude cannot import a job posting, create an application, publish a CV version or change your photo. Setting an application to Applied only records your own update; CVizza never contacts an employer.
What you need
- A CVizza account.
- The Claude Desktop app with access to custom connectors. If you cannot add a custom connector, check your Claude plan, or ask the owner of your Claude organization.
- If you want to allow changes and you only sign in with Google, set a CVizza password first with the password recovery flow. Approving write permissions asks for your current password.
If you use Claude Code in a terminal instead, follow Connect Claude Code to CVizza. The two setups use different connection details, so do not mix them.
Step 1: Open the Claude Desktop setup in CVizza
- Open your account settings and select Connections.
- Select the Claude Desktop tab.
- Select Setup instructions.
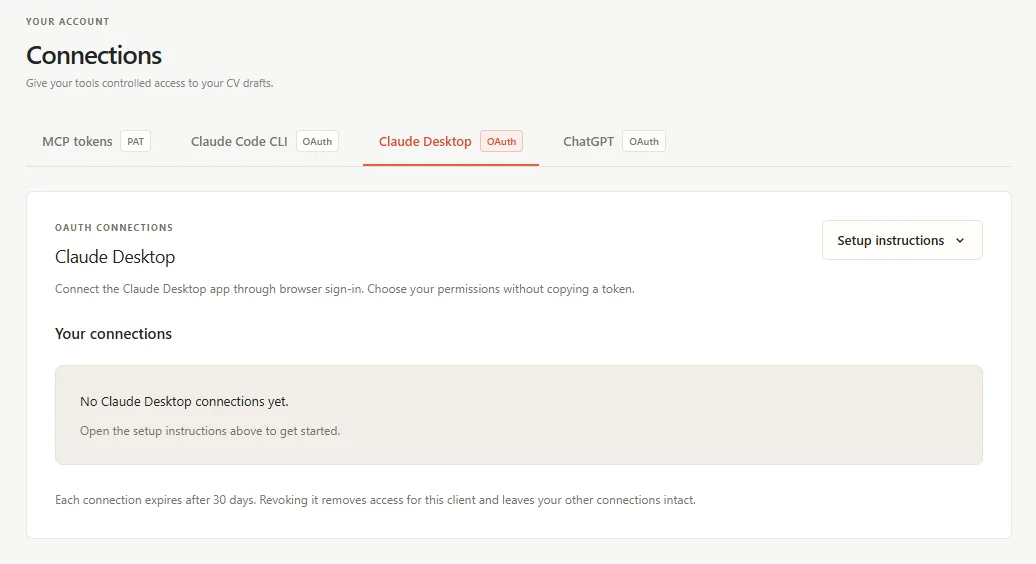
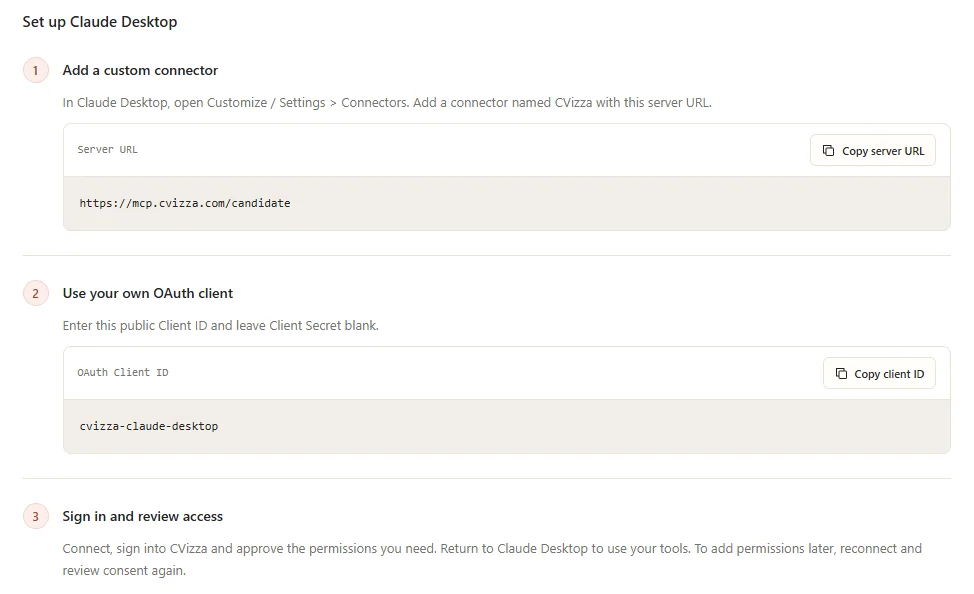
The instructions show the two values you need in Claude Desktop, each with a copy button:
- Server URL:
https://mcp.cvizza.com/candidate - OAuth Client ID:
cvizza-claude-desktop
Step 2: Add the connector in Claude Desktop
- In Claude Desktop, open Settings (on some versions Customize) and select Connectors.
- Choose to add a custom connector.
- Enter CVizza as the name and paste the Server URL from CVizza.
- Open the advanced OAuth settings, paste
cvizza-claude-desktopas the OAuth Client ID, and leave OAuth Client Secret empty. CVizza does not use a client secret. - Save the connector.
Use the Client ID from the Claude Desktop tab. The Claude Code ID (cvizza-claude-code) does not work in Claude Desktop, and CVizza rejects the sign-in if you use it. If you entered the wrong ID, remove the connector and add it again.
Step 3: Connect and approve access
- Select Connect next to the CVizza connector. Claude opens CVizza in your browser.
- Sign in to CVizza if you are not signed in already. If you use two-factor authentication or there are updated Terms to accept, CVizza asks for that first.
- CVizza shows the account you are connecting and a list of permissions. Only Read CV drafts is ticked at first. Tick every other permission you want Claude to have.
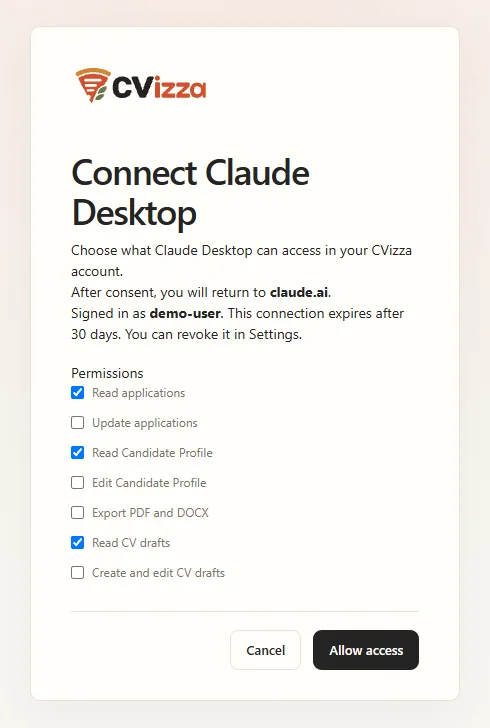
| Permission | What Claude can do |
|---|---|
| Read CV drafts | List and read your CV drafts |
| Create and edit CV drafts | Create, update and copy drafts and choose their template |
| Export PDF and DOCX | Export a draft as PDF or DOCX |
| Read Candidate Profile | Read your candidate profile |
| Edit Candidate Profile | Update your profile and its entries |
| Read applications | List applications and read their details and activity |
| Update applications | Change a status, add a note, archive or restore |
Editing an existing record needs both its read and its write permission. Exporting needs Read CV drafts and Export PDF and DOCX. For a first try, tick the three read permissions only: Claude can then look at your data but cannot change it.
- Select Allow access. If you ticked any permission that can change data, CVizza first asks for your current password, and for an authenticator code if you use one.
- CVizza sends you back to Claude, and the connector shows as connected. The connection also appears under Your connections on the Claude Desktop tab in CVizza.
Cancel grants nothing. The approval page is valid for five minutes; if it expires, select Connect again in Claude Desktop.
Step 4: Try your first request
Start a new chat and make sure the CVizza connector is turned on in the chat's tools menu. Then try requests that only read your data:
- "List my CV drafts."
- "Show my candidate profile and tell me which sections are still empty."
- "List my applications and summarize where each one stands."
When you are ready for changes, reconnect with the write permissions you need (see below) and ask Claude to show the change before saving it:
- "Rewrite the summary of my Product Designer CV for a senior UX role. Show me the new text before you save it."
- "Create a new CV called Data Analyst from my profile and choose a one-column template."
- "Move my most recent application to Interview and add a note about Thursday's call."
If a request needs a permission you did not approve, CVizza refuses it and nothing is changed.
Change permissions later
To add or remove permissions, disconnect the CVizza connector in Claude Desktop and connect it again. CVizza shows the approval page again, and you can tick a different set. A new approval replaces your previous Claude Desktop connection; it never keeps old permissions you did not approve again.
Disconnect
- In CVizza: on the Claude Desktop tab, select Revoke next to the connection. Claude loses access straight away. Your Claude Code connection and personal access tokens keep working.
- In Claude Desktop: disconnect or remove the CVizza connector in Connectors.
Each connection also ends automatically after 30 days. To keep using CVizza after that, connect again from Claude Desktop.
Limits
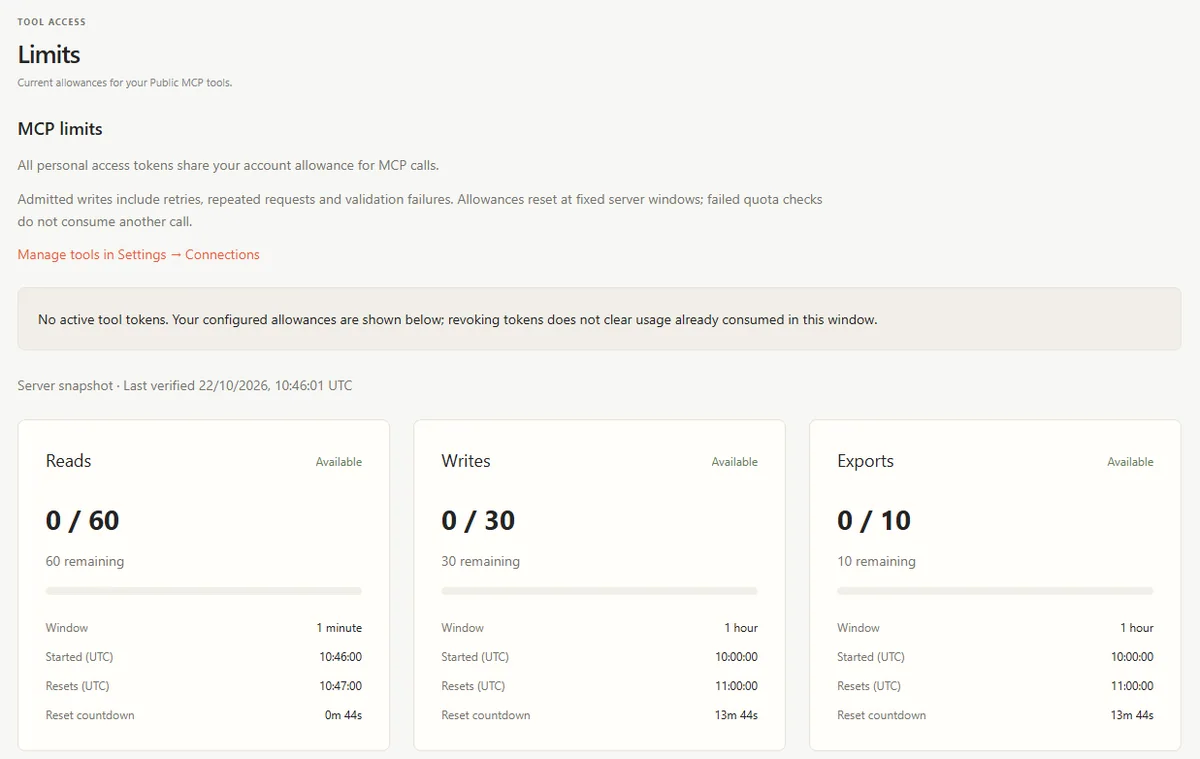
All your connections share one allowance per account: 60 reads per minute, 30 writes per hour and 10 exports per hour. Retries count too. Reconnecting does not reset the counters. You can see your current usage in your workspace under Limits.
Stay safe
- Approve only the permissions you need for the task.
- Keep Claude's approval prompts on for tools that change data, and read each proposed change before you allow it.
- Your CV, profile and notes can contain text copied from job postings. Claude should treat that text as data, never as instructions.
If something does not work
- CVizza shows "Invalid authorization request" after you select Connect. The connector most likely uses the wrong Client ID. Remove it, add it again with
cvizza-claude-desktop, and connect from scratch. Retrying the old browser page does not help. - The approval page shows an error after a pause or after you cancelled. The request expired or was cancelled. Select Connect again in Claude Desktop.
- Claude stopped working with CVizza after you revoked the connection. Connect the connector again and approve access.
- A change is rejected because the draft changed. Someone, possibly you in another tab, edited it in the meantime. Ask Claude to read it again and review the new version.
What to do next
- Keep the data Claude reads accurate with Build your candidate profile.
- Learn how drafts and versions work in Create and export your first CV.
- Add jobs to track in Add a job to your application tracker.