
Getting started with CVizza MCP
Connect Codex, Claude Code or another MCP client to CVizza with a personal access token, choose permissions, and try your first request.
CVizza can connect to an AI assistant that supports the Model Context Protocol (MCP), such as Claude Code or Codex. Once connected, you can ask the assistant in plain language to look at your CV drafts, candidate profile and applications, and, if you allow it, to change them. This guide explains what the connection can do, what you need, how to set it up, and which first request to try.
This guide uses a personal access token, which works with Codex and any MCP client that can send a bearer token. If you use Claude Code, Claude Desktop or ChatGPT, you can connect without a token through browser sign-in instead: see Connect Claude Code to CVizza, Connect Claude Desktop to CVizza or Connect ChatGPT to CVizza.
What you can do through an assistant
The assistant works with your own CVizza data only, using a personal access token that you create and control. These are the main tasks:
- CV drafts: list your CVs, read one, create a CV from your candidate profile, update its title, language or content, make a copy, and export it as PDF or DOCX.
- CV versions: list and read the published versions of a CV, for example to check which version you sent to an employer.
- Templates: list the available templates, filter them by one or two columns and by photo support, and choose one for a draft.
- Candidate profile: read your profile, update profile fields, and add or change experience, education, skills, languages, certifications and projects.
- Applications: list your applications and their activity, create an application from a job posting you give the assistant, correct the job details, change a status, update notes and your expected salary, archive or restore an application, and look up employers you already track.
- Activity and CVs: record a recruiter contact, an interview or a note, correct the comment on an activity entry, and attach the CV you sent to an application.
CVizza does not run an AI model for this feature. Your assistant does the reasoning, and CVizza provides the tools and checks every request against your token's permissions.
Create applications and attach CVs
To add a job through the assistant, give it the text of the posting, for example by pasting it into the chat. The assistant prepares the job title, employer, description and other details, and CVizza saves them as a new application. Ask the assistant to show you the extracted details before it creates the application, the same way you would review an import in the web app.
When you attach a CV, the application keeps that exact CV, even if you edit the draft later. You can attach a CV in two ways:
- A published version: the assistant attaches a version you already published.
- Your saved draft: CVizza turns the current saved draft into a permanent version and attaches it. This happens only when you create an application with a CV or attach a CV to an application. Ordinary edits to a draft never publish a version.
If you attach several CVs over time, the one with the latest submission date becomes the current CV of the application. Earlier submissions stay in its activity history.
What the connection cannot do
- It cannot fetch web pages. If you give it a link to a job posting, CVizza stores the link but never opens it. Paste the text of the posting instead. To import a posting directly from a link, use the web app, as described in Add a job to your application tracker.
- It cannot publish a CV version on its own. A version is created only when you attach a saved draft to an application, as described above.
- It cannot change the type or date of an activity entry, only its comment.
- It cannot delete applications. Archive them instead.
- It cannot change your profile photo.
- Setting an application to Applied only records your own statement. CVizza never contacts an employer.
What you need
- A CVizza account. If you only use Google sign-in, set a password first through the password recovery flow, because creating a token with write permissions asks for your current password.
- An MCP client that supports remote servers over HTTP and a bearer token, such as Claude Code or Codex.
- A few minutes to create a token and add one configuration block to your client.
Step 1: Create a token
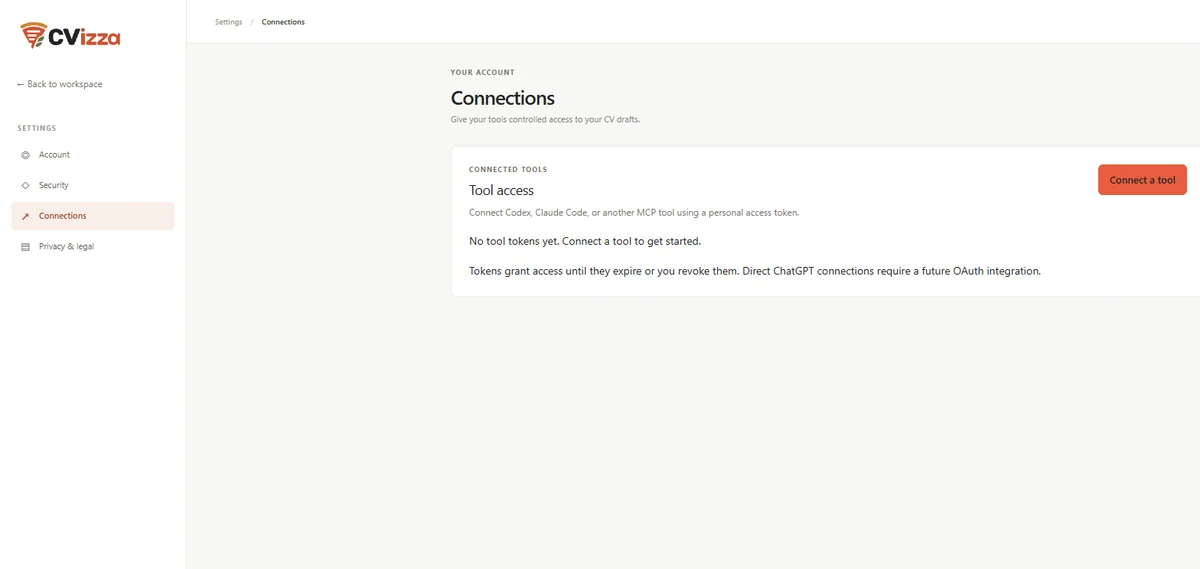
- Open your account settings and select Connections. The MCP tokens tab opens first.
- Select Connect a tool.
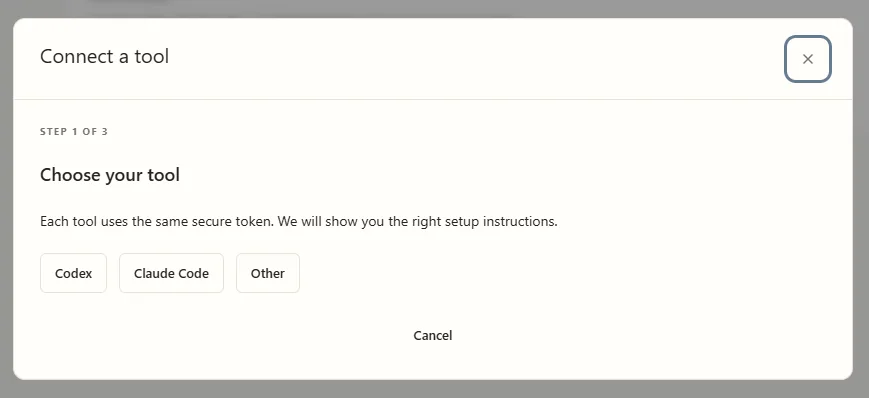
- Choose your tool: Codex, Claude Code or Other. All of them use the same kind of token, and the next steps show instructions for the tool you chose.
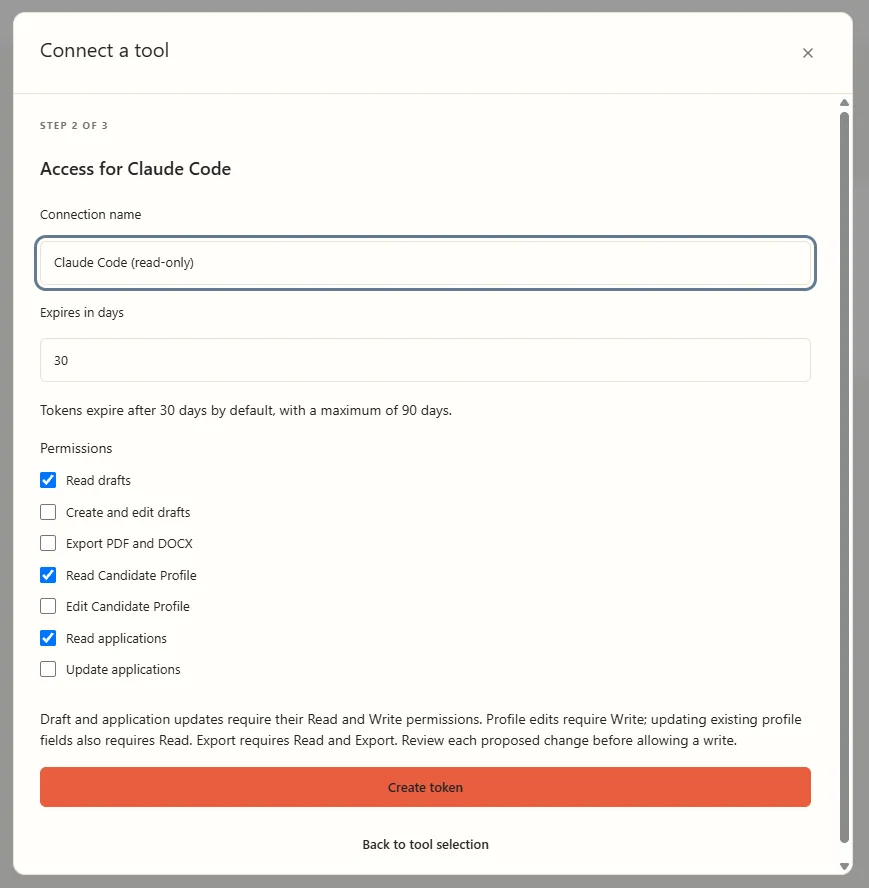
- Give the connection a Connection name so you can recognize it later, and choose how many days the token stays valid. The default is 30 days and the maximum is 90.
- Choose the permissions:
| Permission | What the assistant can do |
|---|---|
| Read drafts and CV versions | List and read your CV drafts, their published versions and the templates |
| Edit drafts and freeze CV attachments | Create, update and copy CV drafts, choose their template, and turn a saved draft into a version when attaching it to an application |
| Export PDF and DOCX | Export a CV draft as PDF or DOCX |
| Read Candidate Profile | Read your candidate profile |
| Edit Candidate Profile | Update profile fields and add or change profile entries |
| Read applications | List applications, read their details and activity, and look up employers |
| Create and update applications | Create applications, correct job details, change status, update notes and expected salary, record activity, attach CVs, archive or restore |
Some tasks need more than one permission:
- Editing drafts or applications needs both the read and the write permission for that area.
- Adding a profile entry needs Edit Candidate Profile, and updating existing profile fields needs both profile permissions.
- Exporting needs Read drafts and CV versions and Export PDF and DOCX.
- Attaching a published CV version to an application needs both application permissions and Read drafts and CV versions. Attaching your saved draft also needs Edit drafts and freeze CV attachments.
Any permission that can change data asks for your current CVizza password, and for an authenticator code if you use one. A token with read permissions only does not ask for the password.
For a first try, choose only the read permissions: Read drafts and CV versions, Read Candidate Profile and Read applications. You can create another token with more permissions later.
- Select Create token.
Permissions of a token never change after you create it. A token created earlier with both application permissions can use the newer application tools, such as creating applications and attaching CVs, without any change.
Step 2: Copy the setup instructions
CVizza shows the token once, together with setup instructions for your tool. Copy the token now. It cannot be shown again, and it is never saved in your browser.
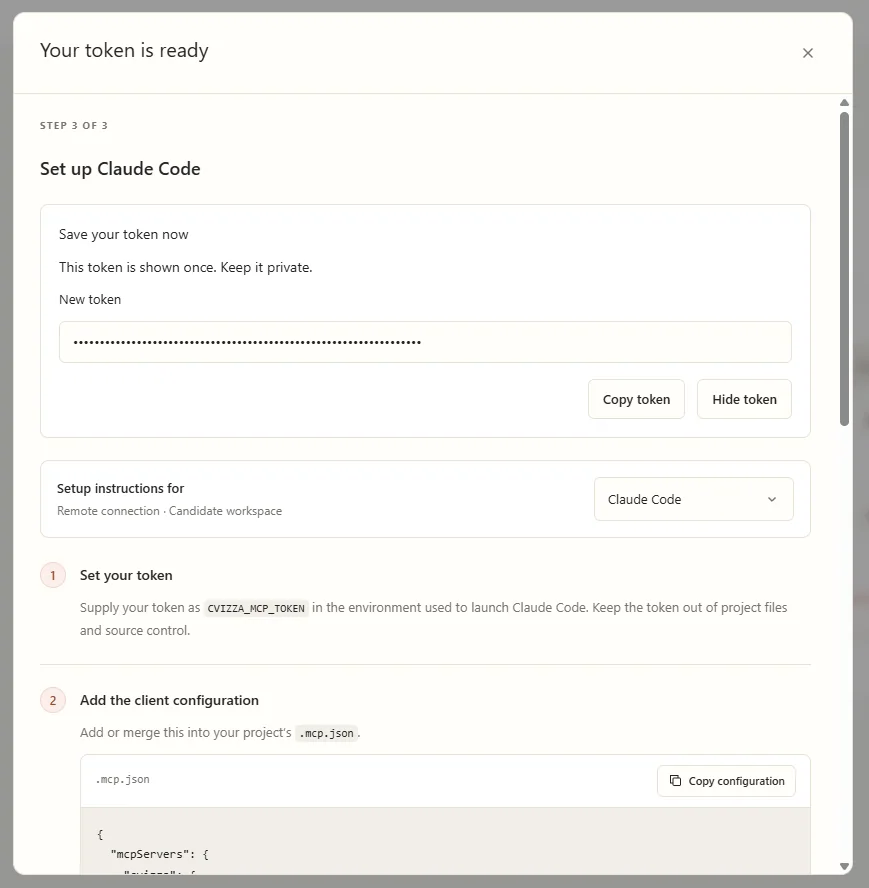
Follow the numbered instructions in the dialog:
- Set your token. Store the token in an environment variable named
CVIZZA_MCP_TOKEN, in the environment that starts your tool. Keep it out of project files, source control, screenshots and shared terminal history. - Add the client configuration. Copy the configuration from the dialog. The address is specific to your CVizza environment, so use the one the dialog shows. For Claude Code, the configuration goes into your project's
.mcp.json:
{
  "mcpServers": {
    "cvizza": {
      "type": "http",
      "url": "<address shown in the dialog>",
      "headers": { "Authorization": "Bearer ${CVIZZA_MCP_TOKEN}" },
      "timeout": 60000
    }
  }
}
For Codex, the configuration goes into its MCP server settings:
[mcp_servers.cvizza]
url = "<address shown in the dialog>"
bearer_token_env_var = "CVIZZA_MCP_TOKEN"
tool_timeout_sec = 60
default_tools_approval_mode = "writes"
If you chose **Other**, use any client that supports remote MCP servers over Streamable HTTP, and send the token in an `Authorization: Bearer` header.
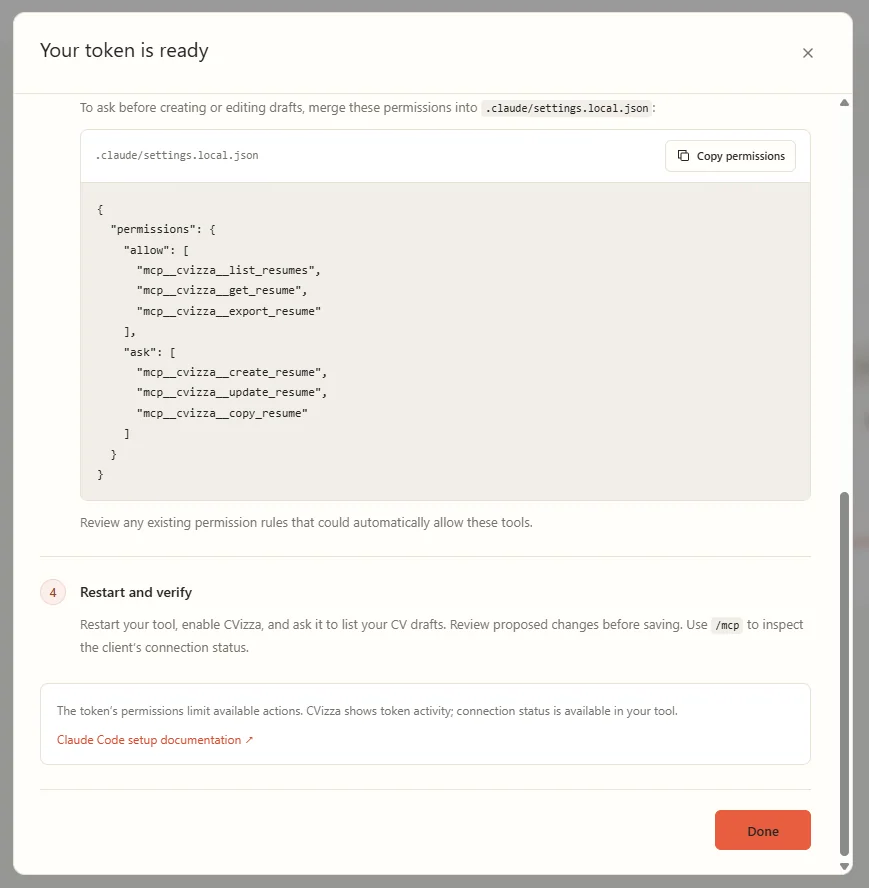
- Review tool permissions. Optionally ask your tool to confirm before it changes anything (see below).
- Restart and verify. Restart your tool and enable CVizza.
Step 3: Restart and check the connection
- Restart your tool so it reads the new configuration. The environment variable must be visible to the process that starts the tool.
- Open the tool's MCP status view. In Claude Code, enter
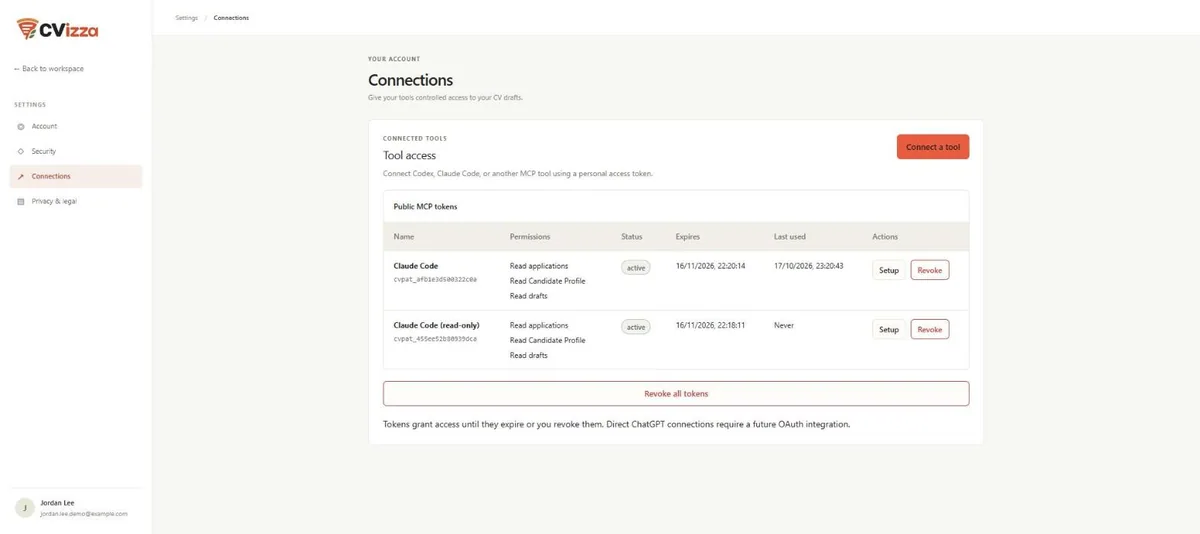
/mcp. Check that cvizza is listed as connected. - In CVizza, the Last used column on the Connections page shows when the token was last used. It proves that the token was used, not that a client is currently connected, so rely on your tool's status view for that.
Step 4: Try your first request
Start with something that only reads your data. With the read permissions from Step 1, try one of these requests:
- "List my CV drafts."
- "Show my candidate profile and tell me which sections are still empty."
- "List my applications and summarize where each one stands."
The assistant calls the matching CVizza tool and answers from the result. For example, "List my CV drafts" returns each draft's title, language and update time.
When you are comfortable, create a token with more permissions and try changes. Ask for the proposed change first, and approve the write only after you have read it:
- "Rewrite the summary of my Data Analyst CV for a junior BI analyst role. Show me the new text before you save it." (needs Read drafts and CV versions and Edit drafts and freeze CV attachments)
- "Create a new CV called Product Designer from my profile and choose a one-column template." (needs Read drafts and CV versions and Edit drafts and freeze CV attachments)
- "Export my Data Analyst CV as a PDF." (needs Read drafts and CV versions and Export PDF and DOCX)
- "Here is a job posting I want to track: [pasted text]. Show me the title, employer, location and salary you found, then save it as an application with the status Saved." (needs Read applications and Create and update applications)
- "Mark my Harbourline Logistics application as applied, attach my Data Analyst CV as I sent it today, and add a note that I applied on the company website." (needs Read applications, Create and update applications and Read drafts and CV versions, plus Edit drafts and freeze CV attachments if the CV has no published version yet)
- "I had a technical interview with Harbourline Logistics yesterday. Record it with a short summary." (needs Read applications and Create and update applications)
If a request needs a permission that the token does not have, CVizza refuses it with the message "Required token permission is missing". Create a token with the permission you need.
Stay in control of changes
Approve writes
In the Codex configuration above, default_tools_approval_mode = "writes" makes Codex ask about tools that change data. In Claude Code, you can merge permission rules into .claude/settings.local.json so that read tools run without a prompt and changing tools ask first:
{
  "permissions": {
    "allow": [
      "mcp__cvizza__list_resumes",
      "mcp__cvizza__get_resume",
      "mcp__cvizza__export_resume",
      "mcp__cvizza__list_resume_versions",
      "mcp__cvizza__get_resume_version",
      "mcp__cvizza__list_resume_templates",
      "mcp__cvizza__get_candidate_profile",
      "mcp__cvizza__list_applications",
      "mcp__cvizza__get_application",
      "mcp__cvizza__list_application_events",
      "mcp__cvizza__list_application_employers"
    ],
    "ask": [
      "mcp__cvizza__create_resume",
      "mcp__cvizza__update_resume",
      "mcp__cvizza__copy_resume",
      "mcp__cvizza__select_resume_template",
      "mcp__cvizza__update_candidate_profile",
      "mcp__cvizza__add_profile_item",
      "mcp__cvizza__update_profile_item",
      "mcp__cvizza__create_application",
      "mcp__cvizza__update_application_tracking",
      "mcp__cvizza__update_application_vacancy",
      "mcp__cvizza__change_application_status",
      "mcp__cvizza__add_application_note",
      "mcp__cvizza__add_application_event",
      "mcp__cvizza__update_application_event_comment",
      "mcp__cvizza__attach_application_cv",
      "mcp__cvizza__archive_application",
      "mcp__cvizza__restore_application"
    ]
  }
}
Review any existing permission rules in your project that could allow these tools automatically.
Treat CV and job text as data
Your CV, profile, notes and the job postings you paste can contain text from other sources. An assistant should never follow instructions that appear inside that text. Keep write approvals on, and read each proposed change before you allow it.
Use the smallest permissions
Create separate tokens for separate purposes, and give each one only the permissions it needs.
Manage and revoke tokens
The Connections page lists each token with its name, prefix, permissions, status, expiry date and last use. Setup reopens the instructions for a token, but it cannot show the secret again. Revoke stops a single token and Revoke all tokens stops every token. A revoked or expired token stops working immediately. You can have up to 20 active tokens.
Limits
To protect your account, limits apply per account and per token: 60 reads per minute, 30 writes per hour and 10 exports per hour. Your tokens and your browser sign-in connections share the same account allowance, so creating more tokens does not raise it. Retries count toward the limits too. A request that hits a limit returns the number of seconds to wait before you retry. Exported files are limited to 8 MB. You can see your current usage in your workspace under Limits.
If something does not work
- The tool says it is not authorized. Check that the token is correct, has not expired or been revoked, and that
CVIZZA_MCP_TOKENis set in the environment that starts the tool. - CVizza is not listed in the tool. Check the configuration file location and the address, then restart the tool.
- A change is rejected because the draft changed. Ask the assistant to read the item again, review the differences, and repeat the change. The same applies when attaching a saved draft that you edited in the meantime.
- A request is refused for a missing permission. Create a new token that includes the permission.
- The assistant cannot read a job link. CVizza never opens links. Paste the text of the posting into the chat instead.
- You use ChatGPT or Claude Desktop. These connect through browser sign-in, not a token. Follow Connect ChatGPT to CVizza or Connect Claude Desktop to CVizza.
What to do next
- Learn how drafts work in Create and export your first CV.
- Keep the data your assistant reads accurate with Build your candidate profile.
- See how applications, activity and attached CVs work in Track your job applications.